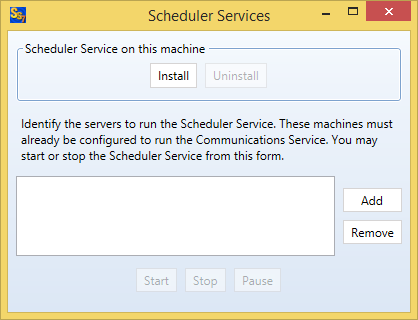
Installing the SureSync Scheduler is done by going clicking the "Home" button and then "Scheduler Services". The SureSync Scheduler is shared by all products within the SureSync Data Protection and Availability Suite.
Once the 'Scheduler Service Servers' window is open click on the 'Install' button. This will install the Scheduler on the local machine. If you are trying to add another Scheduler which is running on a remote machine please see the
Using Multiple Schedulers topic.
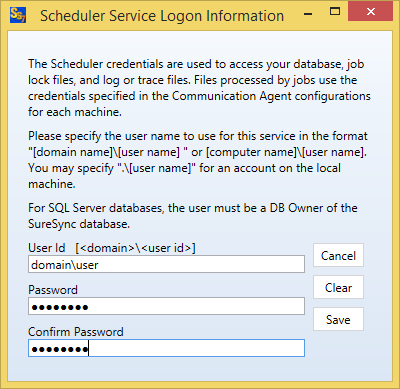
The service must be assigned a user account that the Scheduler will run under. This user account must have adequate permissions on the systems involved in the synchronization to access the files and folders that you are planning to synchronize. This is the user account SureSync will run under. This user account must also be a member of the local administrators group on the machine where the Scheduler service will be running.
On standalone workstation machines (XP, Vista, 7 and 8) it's possible that your user account does not have a password. In order to use the SureSync Scheduler the account that the Scheduler is running under must have a password. You can accomplish this by either adding a new user account to the system or by adding a password to your existing account. Adding a password to your existing account will require you to enter that password to log in to your machine (this is a good idea for security purposes anyway). The account must be a member of the local administrators group on the machine in question.
The following articles from Microsoft's web site discuss adding a new user to a Windows XP machine and managing Group Membership. If you have questions about users and groups for Windows 2000 you can search on Microsoft's web site by clicking
here or consulting the operating systems help file.
 If you are using the Communications Agent Add-on it is possible to configure a different user name and password for each Communications Agent. SureSync will then use the user account associated with each Communications Agent to access the folders and files on that machine. This allows you to configure SureSync to run the Scheduler using a local user account and configure each Communications Agent using a local account for that Communications Agent machine. This type of configuration can be useful in very highly secure network environments.